So you just got your new Soundbar! The below is a quick and informative guide on what you need to know regarding setup.
First things first, the Stealth LED Soundbar is a multi-format device that can be used Wirelessly on Mobile, Tablets and PC via Bluetooth connectivity.
In addition to this, it can also be used on Gaming Consoles, Mobile/Tablet devices and PC via 3.5mm jack connectivity also.
With its simplistic setup, you can listen to audio from music, film and games through the portable device.
Now that we’ve got the intro out of the way… Let’s move on to the exciting stuff!

The STEALTH Soundbar comes with various handy features, including:
24hr Clock, Built-in Alarm and Gaming Session Timer, as well as the eye-catching RGB LED light-up feature. But we’ll get into that in more detail shortly.
The first thing you’ll notice on your Soundbar are the Buttons situated at the top of the device. (Overview of buttons and their functions attached below)
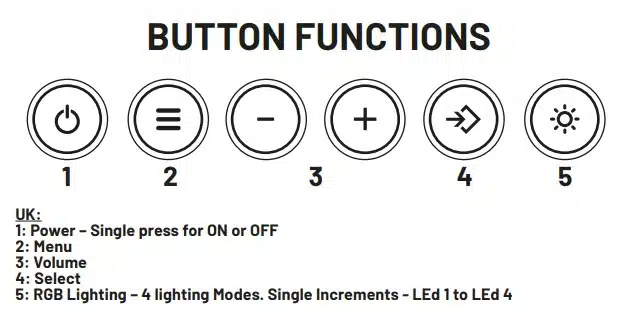
The Menu button is where the Useful Features Reside… And once accessed within the Menu, these will appear as little symbols/icons (shown below).

24HR CLOCK –
This is the first symbol and is where you can manually set the time on your Soundbar. The steps to do this are as follows:
- Press the Menu button until the Clock symbol appears on screen (symbol will start to flash)
- Press Select button to confirm (Clock symbol and hour will start to flash)
- Press the Menu button to select the hour and minute, using the + and – to set the time
- Press the Select button to confirm selection. When the time has been set the clock symbol will disappear off the screen
ALARM –
This is the second symbol and is where you can manually set an Alarm on your Soundbar. The steps to do this are as follows:
- Press the Menu button until the Alarm Clock symbol appears on screen (symbol will start to flash)
- Press Select button to confirm (Alarm Clock symbol and hour will start to flash)
- Press the Menu button to select the hour and minute, using the + and – to set the time
- Press the Select button to confirm selection. The Alarm clock symbol will stay solid on screen
The Alarm alert will work in the following way until switched off by the user…
The Alarm will sound for one minute, if not turned off in that time, the alarm will go into snooze for four minutes.
This will be repeated a maximum of three times. Press any button to turn off the alarm.
Press both + and – buttons at the same time to turn off or, reactivate the alarm at anytime.
GAMING TIMER –
This is the third symbol and is where you can manually set a Timer on your Soundbar. The steps to do this are as follows:
- Press the Menu button until the Gaming Session Timer symbol appears on screen (symbol will start to flash)
- Press Select button to confirm (Gaming Session Timer symbol and hour will start to flash)
- Press the Menu button to select the hour and minute, using the + and – to set the time
- Press the Select button to confirm selection. The Gaming Session Timer symbol will stay solid on screen
The Timer alert will sound for one minute. Press any button to turn off in that time.
WIRELESS SETUP –
This is the fourth symbol presented by a Bluetooth icon for Wireless Connectivity. To activate Bluetooth functionality on the Soundbar, the steps are as follows:
- Press the Menu button until the Bluetooth symbol appears on the screen (symbol will start to flash)
- Press the Select button to confirm. The Bluetooth symbol will continue to fast flash until paired
- Go to your Mobile or any Bluetooth compatible device and select ‘Light Up SoundBar’
- If paired successfully the Bluetooth symbol will light solid on screen

WIRED SETUP –
This is the fifth symbol presented by a Wired Jack icon for Wired Connectivity. For Wired functionality on the Soundbar, the steps are as follows:
- Plug one end of the 3.5mm – 3.5mm jack into the back of the soundbar and the other end into a free 3.5mm port on your device. For ex. TV, PC, Controller, Mobile or Tablet device etc.
- Press the Menu button until the 3.5mm Jack symbol appears on screen (symbol will start to flash)
- Press Select button to confirm. The symbol will light up solid on screen
*Volume can be adjusted via the + and – but also from the device you are using – TV, PC, Mobile, Tablet etc. Music Tracks must be changed via your device.*

BATTERY ICON –
This is the sixth and final symbol and is presented by a charging icon.
When the battery is running low on your Soundbar, the device will inform you that this is the case, by issuing out two short and distinctive sounds, during which all audio will be interrupted momentarily and then resume back to normal once the short sounds have occurred.
This will happen a few more times until the charging cable is inserted into the Soundbar device.
CHARGING THE SOUNDBAR
- Plug in the smaller end (USB C) of the charging cable into the back of the soundbar and the larger end into a free USB port
- The Charging symbol will appear on screen and start to flash, signifying the device is charging
- The Charging symbol will light solid to signal the device is fully charged
N/B – Charging the rechargeable battery takes around 3-4 hours
Battery life is around 2 hours based on the volume being at maximum and LED’s/Clock being powered on.
USING THE SOUNDBAR ON GAMING CONSOLES –
 To use the LED Soundbar with Gaming Consoles,
the primary connection would be one end of the jack cable into the soundbar and the other end directly into a TV that has a 3.5mm jack connection.
However, for those who prefer a more desktop setup, simply connect the cable to the Soundbar and the other end into a controller.
Either way and depending on your preference, the WIRED setup instructions remain the same for each method. Upon connecting the cable between your chosen devices, click the menu button until you reach the Wired icon. The icon with the Wired jack will then begin to flash
Next, click the ‘Select’ button and all audio should be coming through the Soundbar. Please note that you can control the volume level using the + or – buttons on the device.
Only WIRED connectivity is compatible with XBOX One, Series X|S, PS4 and PS5, as the consoles do not have built-in Bluetooth capability.
NINTENDO SWITCH
As for Nintendo Switch consoles, both Wireless and Wired Connectivity are supported and so Nintendo Switch setup is up to your preference. For Wireless, simply click the menu button on the Soundbar until the Bluetooth icon starts flashing
Next, click the ‘Select’ button and then turn on Bluetooth on your Nintendo Switch and pair it to the Soundbar when prompted, for connection.
For Wired connectivity with the Nintendo Switch, press the menu button on the Soundbar device until you get to the Wired Jack icon. Should start flashing
Next, click the ‘Select’ button and then plug in the 3.5mm jack with one end in your Switch headphone jack and the other end of the cable going into the Soundbar. All audio should then be coming through the Soundbar.
We hope this article helps!
Posted on 15th Nov 2022 by Natasha


